Anthony J.
New Member
Hey there everyone so, I thought I would start a thread on this new tank. I will do my best to keep it updated as time goes along. First off as the title suggests this is a location specific biotope, I originally found inspiration for this tank while researching Herichthys Bocourti, or the golden mojarra, as it is called in Guatamala. There is an excellent read on this fish (on cichlid-forum.com titled Spawning the Golden Mojarra, Herichthys Bocourti by Dan Woodland) with the tip of the ice of the info I gained through speaking with a few who have made the journey down to see, and collect at this location. Also, simple google searches will yield a lot of info as well.
Anyway, this venture was set in place about 3 years ago when I first obtained a very small 1 1/2' bocourti from the wonderful shop A Place For Pets in Burien, WA (aplaceforpets.org). After around a year of searching I was able to come across a few others from the lake, Thorichthys Aureus "blue", and Asthaheros Robertsoni both were special order again from APFP. After waiting a few more months I was able to aquire some Xiphophorus Mayae, from a breeder in Erie, CO (selectaquatics.com). I was set and excited, I didn't know exactly what my end results would be, but I was going full throttle. Everything was putting on size, the X. Mayae were reproducing fast in an outdoor aquarium I had set up for this purpose, and I was inching forward when the first issue arose.
I noticed that the A. Robertsoni were not growing. Evidently, they are very slow growers but these guys weren't growing at all. So I took them in to the lfs. Ehn, irritating but not enough to slow me down. I spawned the T. Aureus in a 110 gallon with my boucourti who was quite large by this time, around 9", and things were going well.... Then, my wife decided she wanted new carpet in the room the Izabal tank was set up in, so we moved it out, during the process of the move, and a change in my work schedule, which in turn, changed my water change schedule, I made a big over site last winter. After a water change, but before a 3 day trip out of town, I forgot to plug the heater back in. Needless to say, it was cold, and I lost 6 out of 7 very good looking 4" and larger T. Aureus. And all except 3 X.mayae, who I had moved in to join the T. Aureus in the 72 gallon bowfront because of the cold winter. I was pretty upset, as I'm sure one could imagine.
well, I still had 3 young X. Meyae, 1 sub adult T. Aureus, and about 50 young T. Aureus from the spawn. That was late last winter, its the end of summer now, and after growing out my young T. Aureus and X. Mayae, I was ready to get this tank I had recently acquired set up. So first, the tank and equipment. The aquarium is a 120 gallon (4'x2'x2') or "brick" as some of us older guys in the hobby have been calling it. The filter is an Fx5 which was not my first preference, but could not pass on the deal. The heater is a 300 watt Ebo Jager. And the lighting (currently I'm not to sold on this particular lighting for this set) is a coralife power compact with 2x 6500K bulbs.
This is to be a grand show tank, and I really wanted to showcase these specimen in as natural a way as possible. I have never seen a more natural way to showcase fish then a 3 dimensional background. For that, I went to the amazing selection, and completely natural looking Designs By Nature in Eugene, OR (designsbynature.net). I wanted to hand select my background and didn't mind the trip, so I set it up with the owner to do so. My reasoning for wanting to hand select is because every one of the backgrounds at Designs By Nature is hand colored (see website for details). So no two look the same, they all look great, but I had already selected stones for the aquarium, and wanted a background that would match them flawlessly. Ordering from the site online is a great option, and I have done this as well, and am more then happy with the service, shipping/handling of my purchase, and the quality.
On to the background install. This was not a simple install, and as a matter of fact after speaking with the rep, I found out it is one of only two backgrounds that my show anyone any difficulty, but, I did and it wasn't difficult at all. If you can measure correctly, and make a straight cut, it is very simple. So I took a few photos of the install process and will share now what I did, and how I did it.
First of all, this is the background, and the tools necessary to install it.

When you get your background, the chances of it being an exact fit a very slim since there are three companys that manufacture aquariums. so make sure you measure, and measure and measure again, mark on the back of the background, and make sure it is square. You can and should do this over and over again to make sure you are going to have best fit possible. If for some reason you are not confident that you can make a straight, and square cut, it is always better to go slightly bigger then smaller as you can always shave a little off, but you cannot add a little if you go to small. Shaving a little is kind of irritating so I suggest if you aren't handy or confident enough, you grab a buddy that is.
After talking to the rep, he was very helpful, I decided to cut this at an angle following the highest point in the background, which, since you cut from the back, is the inset most part of the background. By doing this, It would hide, if for some reason there was any, imperfections.

I thought this was a mistake, but turns out it was for the better, as it acted as a reference point when lining it back up. Now specifically when doing a cut, this is to get around a center brace, you figure out the most inconspicuous location for the cut the, turn it over cut through about 90% of the material, you will feel the hard sided front when cutting through the back with a knife, and once you have made it all the way through the length of the cut at 90%, you simply hold the back side of the background facing you and snap the two sides forward away from you using the cut as the obvious breaking point.
Then put the two sides back together to try and figure out what is going to be the best, and easiest way to do this within the confines of your aquarium. While putting it back together, I was very carful when dealing with the front portion of the background, it seems very strong, but I wouldn't want to test the durability of it in the center and end up with something I spent good money for being unsightly.
Now that you have it figured out and were very careful not to damage the front of the background, you can gently maneuver it into your aquarium, really taking your time to be gentle and cautious of all edges and corners. Again, I want to place an emphasis that I do believe you could go ahead and bang it around a little and it is probably more then durable to take it, but, when I spend money, time, and effort on something, I want it perfect, so I would advise you take your time, and do a good job.
I got to this point and it stopped, uhh ohh, didn't listen to the advise, this is how I know its a little tedious to shave the edges down a little.

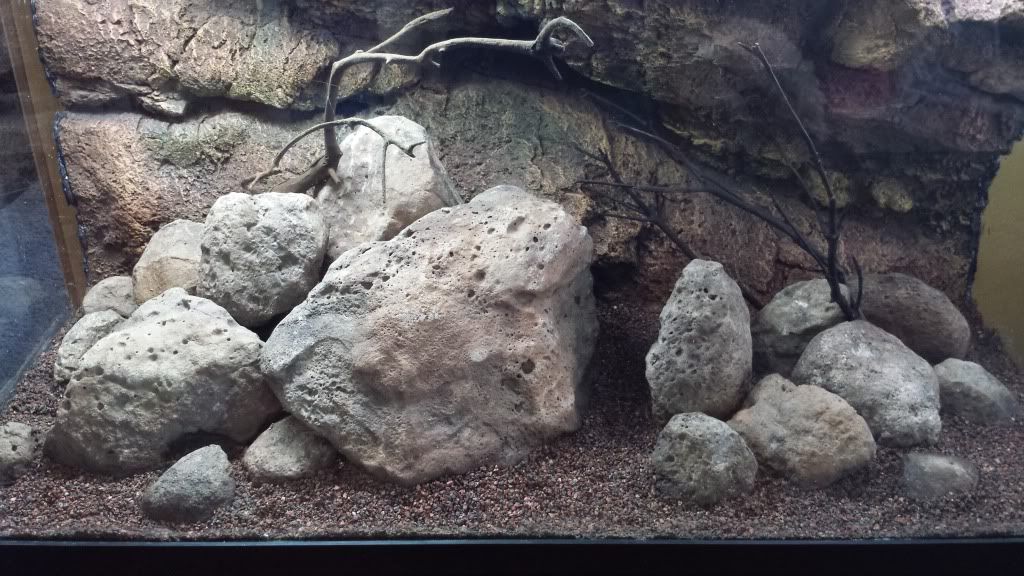
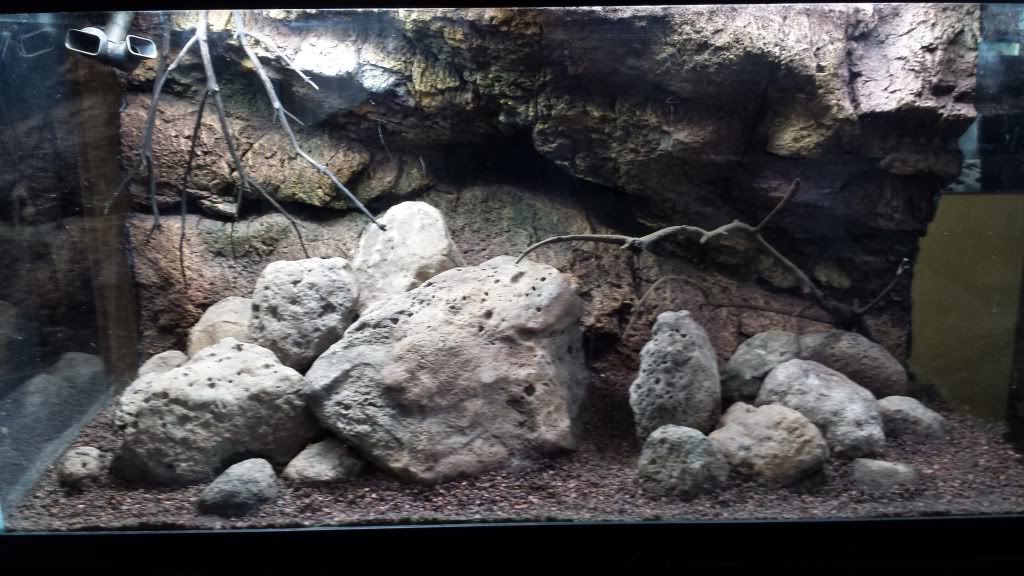
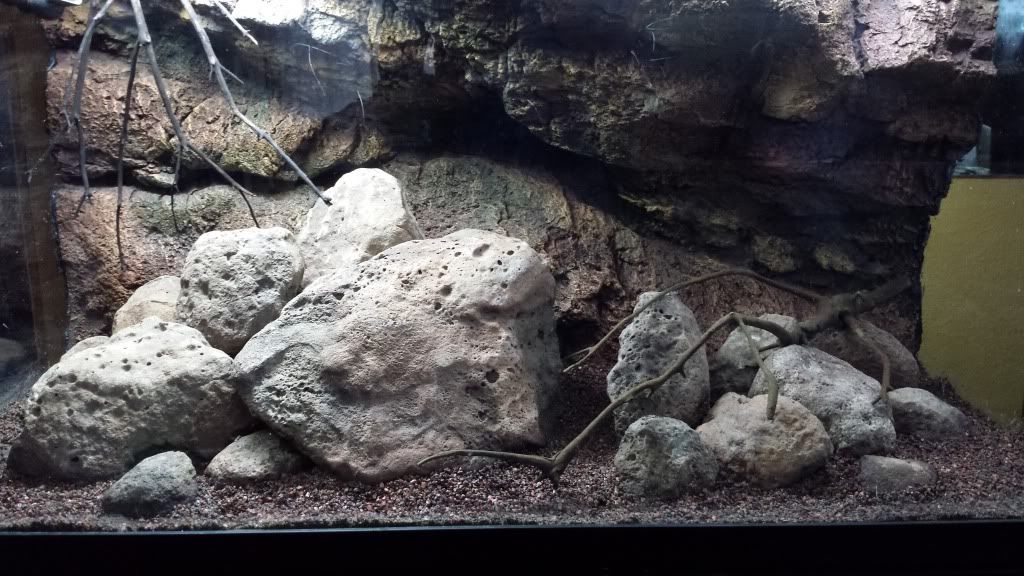
So I got the background into place, again being careful not to damage it, and it fit very well.

I then marked on the bottom of the aquarium with a black felt tipped pen either side of the background (front and back). and slid the background forward about halfway through the aquarium, it was kind of tight, and I would imagine it would be even tighter if I had say a 55 gallon, but it would still be more then possible to do this in a 55 gallon. Once I got the bottom of the background to the center of the aquarium I leaned the top of the background forward about 3/4 of the way to the front of the tank, or until it was touching the front. I ran a nice thick bead of aquarium safe silicone in between the previously marked lines. I then pulled only enough to open the cut ever so slightly, the two pieces towards the back of the tank and ran a thin bead between the two pieces from back of the background. Now when I did this I made sure two things happened, firstly the front was completely aligned so as to not allow and silicone through to the front, and also, that I made sure it was a small bead that would be far to little to make it all the way up to the front of the background.
Then I pushed the pieces back together again (like humpty dumpty). Pulled the bottom of the background back towards the back of the tank where the silicone was, while making sure to keep the pieces together (which isn't difficult) and slid the bottom just to the edge of the silicone line without actually putting it on the silicone, remember it is still angled, so stand it up slowly just in front of the silicone, and when it is straight, you can make tiny inconspicuous marks on the outside of the aquarium along the back of the background. Lean the background back to the forward position, keeping the two parts together, and shimmy it back so that the front of the background is lined up with your front line you previously marked. Run a bead of silicone about 1/2"-1" between the background and the back of the tank, following the lines or inconspicuous marks you made while it was standing straight up. Then pull the top of the background to match up with the back line you made on the bottom of the tank, and that's it.

Sorry the tank is dirty, I only cleaned the inside (which should be done very well before the install).
Well that's all I have time for right now, but I am further along in this project then this and will be updating some more either later, or maybe tomorrow. I hope somebody some day find this to be helpful. And I encourage everyone to try a background, even in a 10 gallon, is so fun to see this little world that actually feels like it was cut from river, lake, stream or pond right in your aquarium. Thanks for reading and have a great day.
Anthony Julian
Anyway, this venture was set in place about 3 years ago when I first obtained a very small 1 1/2' bocourti from the wonderful shop A Place For Pets in Burien, WA (aplaceforpets.org). After around a year of searching I was able to come across a few others from the lake, Thorichthys Aureus "blue", and Asthaheros Robertsoni both were special order again from APFP. After waiting a few more months I was able to aquire some Xiphophorus Mayae, from a breeder in Erie, CO (selectaquatics.com). I was set and excited, I didn't know exactly what my end results would be, but I was going full throttle. Everything was putting on size, the X. Mayae were reproducing fast in an outdoor aquarium I had set up for this purpose, and I was inching forward when the first issue arose.
I noticed that the A. Robertsoni were not growing. Evidently, they are very slow growers but these guys weren't growing at all. So I took them in to the lfs. Ehn, irritating but not enough to slow me down. I spawned the T. Aureus in a 110 gallon with my boucourti who was quite large by this time, around 9", and things were going well.... Then, my wife decided she wanted new carpet in the room the Izabal tank was set up in, so we moved it out, during the process of the move, and a change in my work schedule, which in turn, changed my water change schedule, I made a big over site last winter. After a water change, but before a 3 day trip out of town, I forgot to plug the heater back in. Needless to say, it was cold, and I lost 6 out of 7 very good looking 4" and larger T. Aureus. And all except 3 X.mayae, who I had moved in to join the T. Aureus in the 72 gallon bowfront because of the cold winter. I was pretty upset, as I'm sure one could imagine.
well, I still had 3 young X. Meyae, 1 sub adult T. Aureus, and about 50 young T. Aureus from the spawn. That was late last winter, its the end of summer now, and after growing out my young T. Aureus and X. Mayae, I was ready to get this tank I had recently acquired set up. So first, the tank and equipment. The aquarium is a 120 gallon (4'x2'x2') or "brick" as some of us older guys in the hobby have been calling it. The filter is an Fx5 which was not my first preference, but could not pass on the deal. The heater is a 300 watt Ebo Jager. And the lighting (currently I'm not to sold on this particular lighting for this set) is a coralife power compact with 2x 6500K bulbs.
This is to be a grand show tank, and I really wanted to showcase these specimen in as natural a way as possible. I have never seen a more natural way to showcase fish then a 3 dimensional background. For that, I went to the amazing selection, and completely natural looking Designs By Nature in Eugene, OR (designsbynature.net). I wanted to hand select my background and didn't mind the trip, so I set it up with the owner to do so. My reasoning for wanting to hand select is because every one of the backgrounds at Designs By Nature is hand colored (see website for details). So no two look the same, they all look great, but I had already selected stones for the aquarium, and wanted a background that would match them flawlessly. Ordering from the site online is a great option, and I have done this as well, and am more then happy with the service, shipping/handling of my purchase, and the quality.
On to the background install. This was not a simple install, and as a matter of fact after speaking with the rep, I found out it is one of only two backgrounds that my show anyone any difficulty, but, I did and it wasn't difficult at all. If you can measure correctly, and make a straight cut, it is very simple. So I took a few photos of the install process and will share now what I did, and how I did it.
First of all, this is the background, and the tools necessary to install it.

When you get your background, the chances of it being an exact fit a very slim since there are three companys that manufacture aquariums. so make sure you measure, and measure and measure again, mark on the back of the background, and make sure it is square. You can and should do this over and over again to make sure you are going to have best fit possible. If for some reason you are not confident that you can make a straight, and square cut, it is always better to go slightly bigger then smaller as you can always shave a little off, but you cannot add a little if you go to small. Shaving a little is kind of irritating so I suggest if you aren't handy or confident enough, you grab a buddy that is.
After talking to the rep, he was very helpful, I decided to cut this at an angle following the highest point in the background, which, since you cut from the back, is the inset most part of the background. By doing this, It would hide, if for some reason there was any, imperfections.

I thought this was a mistake, but turns out it was for the better, as it acted as a reference point when lining it back up. Now specifically when doing a cut, this is to get around a center brace, you figure out the most inconspicuous location for the cut the, turn it over cut through about 90% of the material, you will feel the hard sided front when cutting through the back with a knife, and once you have made it all the way through the length of the cut at 90%, you simply hold the back side of the background facing you and snap the two sides forward away from you using the cut as the obvious breaking point.
Then put the two sides back together to try and figure out what is going to be the best, and easiest way to do this within the confines of your aquarium. While putting it back together, I was very carful when dealing with the front portion of the background, it seems very strong, but I wouldn't want to test the durability of it in the center and end up with something I spent good money for being unsightly.
Now that you have it figured out and were very careful not to damage the front of the background, you can gently maneuver it into your aquarium, really taking your time to be gentle and cautious of all edges and corners. Again, I want to place an emphasis that I do believe you could go ahead and bang it around a little and it is probably more then durable to take it, but, when I spend money, time, and effort on something, I want it perfect, so I would advise you take your time, and do a good job.
I got to this point and it stopped, uhh ohh, didn't listen to the advise, this is how I know its a little tedious to shave the edges down a little.

So I got the background into place, again being careful not to damage it, and it fit very well.

I then marked on the bottom of the aquarium with a black felt tipped pen either side of the background (front and back). and slid the background forward about halfway through the aquarium, it was kind of tight, and I would imagine it would be even tighter if I had say a 55 gallon, but it would still be more then possible to do this in a 55 gallon. Once I got the bottom of the background to the center of the aquarium I leaned the top of the background forward about 3/4 of the way to the front of the tank, or until it was touching the front. I ran a nice thick bead of aquarium safe silicone in between the previously marked lines. I then pulled only enough to open the cut ever so slightly, the two pieces towards the back of the tank and ran a thin bead between the two pieces from back of the background. Now when I did this I made sure two things happened, firstly the front was completely aligned so as to not allow and silicone through to the front, and also, that I made sure it was a small bead that would be far to little to make it all the way up to the front of the background.
Then I pushed the pieces back together again (like humpty dumpty). Pulled the bottom of the background back towards the back of the tank where the silicone was, while making sure to keep the pieces together (which isn't difficult) and slid the bottom just to the edge of the silicone line without actually putting it on the silicone, remember it is still angled, so stand it up slowly just in front of the silicone, and when it is straight, you can make tiny inconspicuous marks on the outside of the aquarium along the back of the background. Lean the background back to the forward position, keeping the two parts together, and shimmy it back so that the front of the background is lined up with your front line you previously marked. Run a bead of silicone about 1/2"-1" between the background and the back of the tank, following the lines or inconspicuous marks you made while it was standing straight up. Then pull the top of the background to match up with the back line you made on the bottom of the tank, and that's it.

Sorry the tank is dirty, I only cleaned the inside (which should be done very well before the install).
Well that's all I have time for right now, but I am further along in this project then this and will be updating some more either later, or maybe tomorrow. I hope somebody some day find this to be helpful. And I encourage everyone to try a background, even in a 10 gallon, is so fun to see this little world that actually feels like it was cut from river, lake, stream or pond right in your aquarium. Thanks for reading and have a great day.
Anthony Julian